|

| We'll get you a before picture soon. |
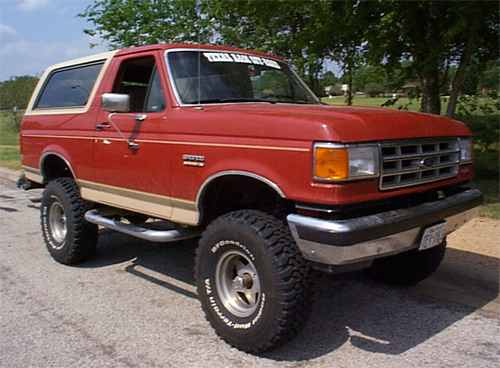
| Here's
what is looked like with the addition of the 3" body lift and 35 BFG MTs. |
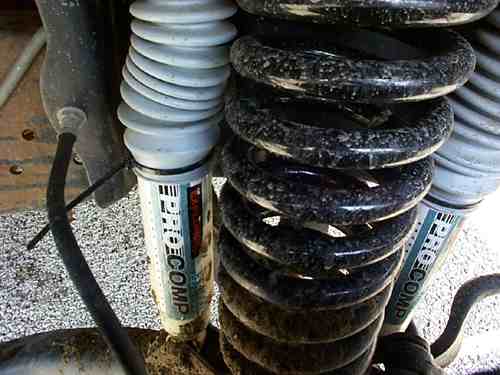
| You
can see where after a couple of months, the shock and spring had done a little rubbing. |
|
Parts List: Pivot
point drops (driver and passenger side)
Radius arm drops (driver and passenger side)
Coil springs
Front/Rear shocks (4 shocks in front optional, 2 required)
Pitman arm
Blocks and U-bolts for the rear
Installation hardware
Tools Required:
Pitman arm puller (rent this one, you’ll never use it again)
Right angle drill
˝" drive ratchet and sockets
Torque wrench capable of 170 ft/pounds
Jack stands
Hydraulic floor lift (more than one is a very good idea)
Centerpunch
File
Hammer
Assorted wrenches
Time Needed for Installation:
Instructions say 10 to 14 hours. It took me and two of my friends about 19 hours. That
is excluding the first two days I messed with the Pro-Comp lift.
First off, to save any confusion, I will be referring to both the Pro-Comp and
Superlift kit for my Bronco. I just want to apologize ahead of time for any badmouthing I
do of Pro-Comp. If you got it to work for your truck I’m sure it’s a sturdy
lift. I just couldn’t get mine on. I had originally bought the Pro-Comp Stage I kit
and had numerous problems with it. Anyway, after three days of pounding on the Pro-Comp
kit I took it back to 4WheelParts and they gave me the Superlift kit without any extra
charge. Anywhere I had trouble or substituted parts I will make a note. The finished
product turned out to be a hybrid of the Pro-Comp and Superlift kits. The rear end is
Pro-Comp and all the shocks are Pro-Comp, but the coils and all the brackets are
Superlift. If you’re looking for a lift for a Bronco or F150 I strongly suggest
spending the extra money to get a Superlift or Rancho lift.
The Process:
- Always chock the wheels before raising the truck. Chock the rear wheels and raise the
front of the vehicle. Place jack stands under the frame rails out of the way of any
suspension parts. Remove the floor jacks and move them to support the axle for when you
are ready to lower it. Remove tires also.
- Remove bolts holding original pitman arm and let the steering linkage hang. Remove the
pitman arm using the pitman arm puller. (you can rent a pitaman arm puller from an auto
parts store for free)
- Remove sway bars from frame and let them hang also.
- Mark the front driveshaft and the front differential yoke so they can reconnected in the
correct way. Disconnect the driveshaft at the U-joint.
- Disconnect the brake lines and plug the ends so you don’t loose all your brake
fluid. Disconnect the vent hose from the differential.
- Remove Nuts holding radius arms on. When taking the radius arms out take care to arrange
the order of the washers and insulators so they can be reinstalled correctly. It is
suggested that the rubber insulators be replaced for better ride. I did that and it cost
about $45.00 total. Do not attempt to remove radius arm yet, just make sure all hardware
holding it to the drop bracket has been taken off and organized correctly.
- Remove the spring’s lower retaining nut and washer, then remove the j-clip that
holds the spring to the coil tower. Lower the jack enough to remove the spring. (I was
unable to remove the spring until I had disconnected the shocks as well). Disconnect all
hardware holding the shocks on and lower the driveshaft. At this point the radius arms
will be free to slide out of the drop bracket. Make sure you either have jackstands or
someone holding the radius arms up because when they come out of the brackets it could
rotate your front end enough to make it fall off the floor jacks. Carefully move the front
end out of your way.
- Now comes the fun part, removing the old brackets. They all have rivets but some more
than others. I can’t remember exactly but I think we took out about 8 rivets. Most of
the rivets are on the driver’s side pivot point. I used an air hammer with a chisel
bit to knock off the heads. Then I used the hammer with a center punch in it to pop out
the rivets.
Like I said before I originally had a Pro-Comp kit and got fed up with and ended up
with a Superlift. Well here’s where the two kits take different paths and I will
compare how installing both went along the way.
- First use a file to clean up the areas you attack with the air tools. Now mount the new
driver side radius arm drop with the existing holes. Do not tighten down! You need this in
place to drill new holes. (For the Pro-Comp kit three new holes needed to be drilled for
each radius arm bracket, Superlift required one.) With bracket in place, use a center
punch to mark the holes. Remove bracket and drill holes. I found it easiest to drill a
pilot hole before the ˝ inch holes. ALSO, VERY IMPORTANT. THE INSTRUCTIONS SAY YOU
NEED A ˝ INCH DRIVE RIGHT ANGLE DRILL WHICH IS HUGE AND I COULD NOT GET IT INTO THE TIGHT
SPACES NEEDED TO DRILL THESE HOLES. IF YOU HAVE ACCESS TO AIR TOOLS AN AIR DRILL IS VERY
TINY AND WILL DO THE JOB IF YOU BUY BITS THAT ARE STEPPED DOWN TO A 3/8 INCH DRIVE.
.
- Now you can reattach the bracket, loctite and tighten bolts down to the torque
specification chart . Do this same process for the rest of the brackets. There are four.
(When you come to the pivot point brackets you will see the difference between Pro-Comp
and Superlift. Pro-comp needed drilling in places I couldn’t even reach with the air
drill. Another very annoying Pro-Comp trait is that since the Pro-Comp parts are lesser
quality metal, a stiffener plate is needed. This requires that you move your power
steering cooling line which runs along the front crossmember. The weak metal also accounts
for the need to drill so many holes for support. Superlift only needed two holes drilled
for each pivot point and they were easily accessible. Pro-Comp needed 5 for the driver
side bracket alone. If you feel the two "identical" brackets you can tell the
Superlift bracket is thicker and weighs almost twice as much. Just make me feel safer to
have the most heavy duty equipment)
- Install new pitman arm and torque to correct specification. (this is where you need a
torque wrench that goes up to 170 ft/lbs.)
- Now move the front end back into position. Position the radius arms into there drop
brackets first. Install the new bushings and put the nut back on the radius arms but do
not tighten. These will act as guides to line up the pivot points.
- Raise floor jack and position beams into pivot point drops. This takes some time. When
trying to line up the holes one trick we used was to stick a center punch through the
bracket hole and played with the arm until it lined up. This will catch the arm in the
correct place and you can line up the holes perfectly.
- After the pivot points are tightened down you can also tighten down the radius arm nuts.
- With front end back in place it is time to install the new springs. First attach the new
coil to the coil tower with the existing j-clip. Now raise the axle enough attach the
lower retaining nut and washer. After both sides are done it time for shocks. If you have
dual shock mounts make sure you know there are two different size shocks for each side.
The shock closest to the front of the vehicle is shorter than the shock on the other side
of the coil. If you do this wrong you will not be able to get two of the shocks on.
- Now reattach the control arm to the pitman arm. Reattach the anti-sway bars. Line up the
drive shaft with the marks you made earlier and connect the u-joint again. Also reattach
the vent hose to the differential.
- And now it’s time to connect the brake lines. With the four inch lift new brake
lines are not needed. Just reattach them and bleed the brakes. Make sure you did not loose
too much brake fluid in this process. Check the reservoir.
- Now you can put the wheels on and let the truck down.
- For the rear end of the truck it’s simple. First, of course, chalk the front wheels
put the rear end frame on jack stands. Place a floor jack under the differential for
support when you lower the axle.
- Remove the wheels and remove the existing u-bolts and shocks.
- Now lower the axle enough to get one of the new blocks positioned in there. Make sure to
stack the blocks. By that I mean leave the existing block and add the lift block under it.
I made the mistake of switching out the new for the old and I couldn’t figure out why
the rear was sagging. Guess I learned the hard way. Once the block is in place, raise the
floor jack enough to make the blocks sit properly in mounts designated for them. You can
tell when they click into place. Now just put the new u-bolts on and tighten it enough to
keep it in place but not all the way. Now lower the jack a little and do the other side.
- Once the blocks are in place you can install the new shocks. They give no extra hardware
for the rear kit so keep all the nuts and bolts you take off. All of them are reused
except of course the u-bolts.
- Now that all that is in place, check to make sure the brake lines are not in danger of
being overextended. Again I didn’t have a problem with brake lines, but it was only a
4" lift.
Problems:
Most of the questions I get asked about my lift is
"What can go wrong if I do it to my truck?" Well I’ve had a few problems
but not many. Most of the problems occur in installation stage. I have already expressed
my dislike of the Pro-Comp lift kit. I’ve already been over Pro-Comps problems so
I’ll get to the general "lift" problems. Like I mentioned before a big
problem for a lot of people is having the right tools. I was fortunate enough to have a
friend who knows a mechanic that let us use his shop. Rivets can pose a big time problem
without air tools or a torch. Also I found a ˝ inch drive right angle drill hard to come
by and when I got it the thing was so massive I couldn’t get it into the cramped
undercarriage to drill the proper holes. Another problem that took a while for us was
getting the front end to line back up after the brackets were in place. It’s so heavy
that it took a person on each end to rotate it into position and one to line up the holes
all at the same time. But that’s not really a big problem. Other than that the
installation wasn’t bad. So far I haven’t had but one problem that I just
noticed. I appears that my new larger coils in the front had put dents in my brand new
shocks. If I can attach a picture I will. I have dual shocks and the shocks closer to the
rear of the vehicle are very close to the coil. I don’t think this will happen unless
you have dual shocks because the other two shocks in front are fine. Anyway, it looks like
after some heavy off-roading when my coil was compressed almost all the way it hit the
side of my shocks and dented them in about 1/8 to 1/4 inch in several places. I
doesn’t really affect anything that I can tell but it kinda ticks me off after
spending that kind of money on a lift. I don’t think anything can be done about this
unless you try to relocate the shock mounts. Other than that I haven’t noticed
anything and I’ve had the lift on for about five months. I think the problems are
minimal for the joy of all that clearance. It’s great once it’s on. |